Hitching and Operating Rotavators: A Practical Guide for Farmers

Table of Contents
- Introduction
- How to get best results from your Rotavator?
- What are the Components of a Rotavator?
- How to Hitch the Rotavator with the Tractor?
Introduction
Rotavator, a PTO driven implement, is one of the most important primary and secondary tillage equipment in agriculture. It is mainly used for pulverizing the soil to prepare even seedbed and remove clods. It also helps in weed control, incorporation of crop residues, and aeration of soil. Its proper attachment enhances soil preparation, promotes better seedbed conditions and healthy crops which leads to successful farming operations. It is important to hitch and use it appropriately with the tractor for reaping its benefits.
How to get best results from your Rotavator?
- It is necessary to pay attention to the tractor’s forward speed, rotor RPM, leveling depth and leveling board settings for appropriate field preparation.
- The speed of the tractor should be between 2.5 km to 3.5 km per hour on the basis of soil conditions while using the rotavator. Similarly, the RPM of the rotor should be between 180 RPM to 240 RPM. The rotor’s RPM is reduced or increased according to the soil type, its moisture, and the crop.
- The single speed rotavator performs sufficiently for the field preparation, however, in unfavorable field conditions you can change the rotor’s RPM with a multi speed gearbox. If the soil is hard and contains low moisture level then it is recommended to keep the rotor’s RPM low, whereas, if the soil is soft and contains some moisture then you can increase the rotor’s RPM.
- It is important to check your engine RPM, if the RPM drop is less than 150 RPM, you can continue working with your chosen gear. However, if the engine RPM drop is more than 150 RPM then you have to pay attention to the depth of ploughing and the leveling board setting. If you continue to operate the rotavator even when the RPM drop is more than 150, it can lead to more fuel consumption and inefficient tillage operation. It can also damage the rotavator in the long run.
What are the Components of a Rotavator?

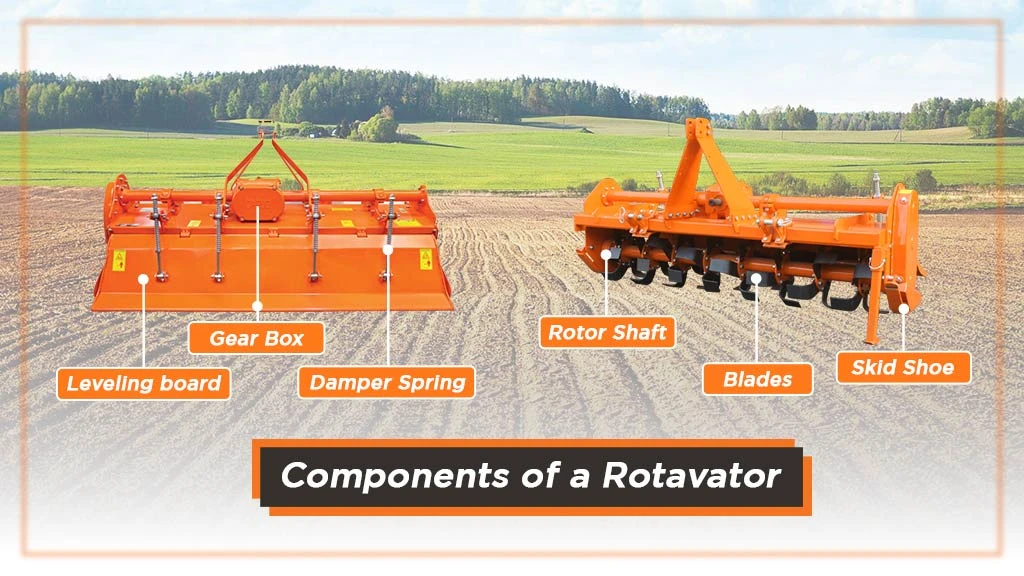
It is very important to get an overview of the implement you wish to use for farming in order to operate it efficiently. Therefore, let’s start by understanding every component of the rotavator along with their functions before learning how to attach it to the tractor:
- Rotor Shaft: it helps in rotating the rotor blades.
- Blades: they do the work of pulverizing the soil.
- Leveling board: it levels the pulverized soil.
- Damper Spring: it maintains the pressure on the leveling board.
- Skid Shoe: it is responsible for controlling the depth of tillage.
- Gear Box: it allows the selection of different rotor speeds.
How to Hitch the Rotavator with the Tractor?
Now that we have gotten an overview about rotavator and its usage. Let’s learn how to attach the rotavator with the tractor appropriately:
- Firstly, make sure that both tractor and rotavator are on the flat or leveled ground for easing the attachment process.
- Attach the rotavator with the help of 3-point linkage to the tractor. Begin with attaching the left link and secure it with a lynch pin then similarly attach as well as secure the right link. Lastly, attach and secure the top link. You cannot attach the right link first because the left link is non-adjustable. So, in case the tractor and implement are not at the same level during the process of attachment, you can adjust the right link for alignment.
- Proceed by mounting the cardan shaft for connecting the rotavator to the tractor. It is responsible for transmitting the power to the rotavator which helps in rotating its blades. Make sure to attach the shear bolt side of the shaft to the rotavator and the other one to the tractor PTO. This is because shear bolts help in protecting the cardan shaft from damage due to heavy load. The shear bolts break and detach the rotavator from the tractor in such scenarios. Also, they are quite affordable and easy to reinstall.
- Make sure to check if the rotavator is leveled with the ground from both the left and right sides. Adjust the depth between 4 to 6 inches as per your requirement with the help of skid shoe.
- In case you wish to increase or decrease the pressure on the leveling board, you can adjust the bolts of the damper spring.
- Next adjust the sway chain in such a way that there is 1 to 2 inches of sway. Open the lock of the sway chain for adjusting its length accordingly and then lock it back again. Make sure the sway is similar on both sides and the rotavator doesn’t touch the tyres of the tractor.
- Lastly, start your tractor and lift your rotavator from the ground to slowly engage the PTO lever to move the cardan shaft. Check for any weird sounds coming from the rotavator if not then you are good to go.
For detaching the rotavator from the tractor reverse the sequence of steps. It is important to completely clean your rotavator before storing after usage. Additionally, make sure to check the implement manual for timely service and maintenance guidance.
You can explore and purchase rotavators from top brands like Shaktiman, Fieldking, John Deere, Mahindra, etc. through our platform at affordable prices. We have more than 900 rotavator models listed on Tractorkarvan to provide you a variety of options. You can additionally ease your financial burden by opting for our quick implement loan facility at attractive interest rates. We also have blogs through which you can learn how to choose the best rotavator for your farm and also get familiar with the top 10 rotavator models for Indian farmers. For any technical assistance or further inquiries contact our experts now.


Related Blogs


